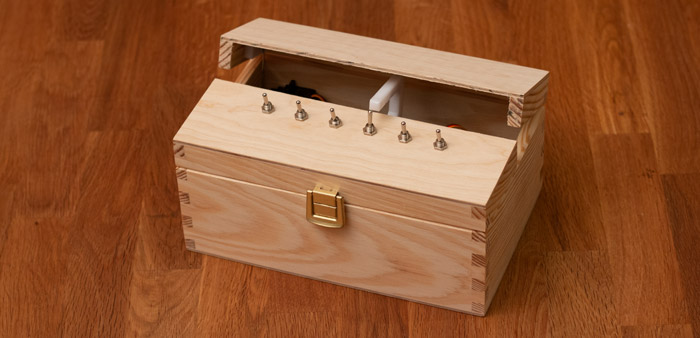
Build a multi-switch useless box with a single moving arm, custom PCB, and 3D-printed mounting — full Arduino code and STL files included.
blog.hirnschall.net


The ESP8266 and ESP32 are the two most widely used Wi-Fi microcontrollers for hobby and professional IoT projects. Both are made by Espressif, both run on 3.3V logic, both work with the Arduino IDE, and both cost only a few euros. If you have read any of the other articles in this series, you already know the ESP8266 well. The ESP32 is its direct successor. Released in 2016, two years after the ESP8266, it was designed to fix nearly every limitation the ESP8266 has.
This article compares the two chips across every relevant dimension: processing power, connectivity, GPIO count, power consumption, price, and known limitations. It also covers when the ESP8266 is still the right choice. Even if it is the older and weaker chip, there are situations where it genuinely wins.
The ESP32 outclasses the ESP8266 in almost every measurable way. It has a faster dual-core processor, more than four times the RAM, Bluetooth, far more GPIO pins, a much better ADC, and lower deep-sleep power consumption. The ESP8266 however has a lower active power draw and is cheaper. If you are starting a new project and cost is not the deciding factor, use the ESP32. If you are building a simple WiFi-only sensor node on a tight budget, especially one that transmits frequently and spends most of its time awake, the ESP8266 remains a good choice.
Below are links to my personal favorites for both chips and development boards:
| ESP-12F | NodeMCU ESP8266 | ESP32-WROOM-32 | ESP32-S3 |
|---|---|---|---|
| amazon.com amazon.de |
amazon.com amazon.de |
amazon.com amazon.de |
amazon.com amazon.de |
| #CommissionsEarned | |||
The table below covers the most common project scenarios. In general: the ESP8266 is the right pick when WiFi-only connectivity and low cost are the only requirements. The ESP32 is the right pick for everything else. It handles all the same scenarios the ESP8266 covers, and adds Bluetooth, more pins, better analog inputs, and a significantly stronger processor. For any new project where you are not constrained by price or existing ESP8266 infrastructure, the ESP32 is the safer long-term choice.
| Use case | ESP8266 | ESP32 | Notes |
|---|---|---|---|
| WiFi-only sensor node | ● | ● | Either works. ESP8266 is cheaper; ESP32 has better deep-sleep current. |
| Bluetooth required (BLE or Classic) | ○ | ● | ESP8266 has no Bluetooth. ESP32 only. |
| Battery-powered, mostly sleeping | ● | ●● | ESP32 deep sleep is 10µA vs 20µA on ESP8266. ESP32 wins here. |
| Battery-powered, frequent transmissions | ●● | ● | ESP8266 active draw (~80mA) is lower than ESP32 (~160-240mA). High duty cycle favours ESP8266. |
| Multiple sensors / peripherals | ○ | ● | ESP8266 has only 11 freely usable GPIO and 1 ADC channel. ESP32 has 34 GPIO and 18 ADC channels. |
| Analog readings (ADC) | ○ | ● | ESP8266 ADC has up to 20% error and degrades further during WiFi activity. ESP32 ADC is 12-bit across 18 channels. |
| Audio (I2S) | ~ | ● | Both have I2S, but ESP32's dual-core processor makes audio processing practical. |
| CAN bus / Ethernet MAC | ○ | ● | ESP32 only. |
| Tight budget / high volume | ●● | ● | ESP8266 is typically $1-3 cheaper per unit. Matters at scale. |
| New project, no constraints | ○ | ●● | ESP8266 is effectively in maintenance mode. ESP32 is the strategic choice for anything new. |
Recommended modules: For the ESP8266, the ESP-12F1 is the bare module used in custom PCB designs, while the NodeMCU ESP82661 is the easiest starting point for breadboard prototyping. For the ESP32, the bare ESP32-WROOM-32 module1 is the standard choice for PCB integration, and the NodeMCU ESP321 development board is the equivalent for prototyping.
The table below lists the key datasheet figures for both chips. All ESP8266 numbers are taken from the Espressif ESP8266 datasheet [1] and are consistent with the measurements documented in the ESP8266 reference article in this series. ESP32 numbers are from the ESP32 datasheet [2].
| Specification | ESP8266 | ESP32 |
|---|---|---|
| CPU | Tensilica Xtensa LX106, single-core | Tensilica Xtensa LX6, dual-core |
| Clock speed | 80 MHz (overclockable to 160 MHz) | 160 MHz / 240 MHz |
| SRAM | 80 KB user-data RAM, 32 KB instruction cache | 520 KB |
| RTC memory | 512 B (inside system RAM) | 16 KB |
| Flash | External, up to 16 MB (typically 1-4 MB on modules) | External, up to 16 MB (typically 4 MB on modules) |
| Supply voltage | 2.8-3.6 V | 2.3-3.6 V |
| WiFi | 802.11 b/g/n, 2.4 GHz, HT20 | 802.11 b/g/n, 2.4 GHz, HT20/HT40 |
| Bluetooth | None | Bluetooth 4.2 Classic + BLE |
| GPIO (total / freely usable) | 17 / 11 | 34 / 34 |
| ADC | 1 channel, 10-bit, 0-1 V input range | 18 channels, 12-bit |
| DAC | None | 2 channels, 8-bit |
| PWM channels (software) | 8 | 16 |
| SPI / I2C / I2S / UART | 2 / 1 / 2 / 2 | 4 / 2 / 2 / 3 |
| CAN | None | 1 |
| Ethernet MAC | None | 10/100 Mbps |
| Touch sensors | None | 10 |
| Active current (avg) | ~80 mA | ~160-240 mA |
| Deep sleep current | 20 µA | ~10 µA |
| Hibernation current | N/A | 5 µA |
| Power-off current | N/A | 1 µA |
| Operating temperature | -40°C to +125°C | -40°C to +125°C |
| Typical price (bare module) | ~$1.50-3 | ~$3-6 |
The ESP8266 uses a single-core Tensilica LX106 processor running at 80 MHz by default, with the option to overclock to 160 MHz. It has 80 KB of user-data RAM and 32 KB of instruction cache. More than enough for typical embedded tasks, but limited when running the WiFi stack alongside complex application code.
The ESP32 uses a dual-core Tensilica LX6 processor running at up to 240 MHz, with 520 KB of SRAM. That is more than six times the memory and roughly three times the single-core processing speed of the ESP8266.
The performance gap matters most in one specific scenario: running the WiFi stack alongside your own code. On the ESP8266, both compete for the same single core. The WiFi stack is not a background process. It needs regular time slices to handle connections, and if your code holds the CPU too long without yielding, the watchdog timer will reset the chip. This means tasks like sensor processing, web serving, and communication all have to be written with explicit yields (delays etc.), and anything computationally intensive can be difficult to run alongside WiFi reliably.
On the ESP32, the WiFi stack typically runs on one core while your application code runs on the other. The result is that complex tasks like parsing data, handling multiple concurrent connections, or running a local web server simply work without the timing considerations required on the ESP8266.
| Specification | ESP8266 | ESP32 |
|---|---|---|
| CPU | Tensilica Xtensa LX106, single-core | Tensilica Xtensa LX6, dual-core |
| Clock speed | 80 MHz (overclockable to 160 MHz) | 160 MHz / 240 MHz |
| SRAM | 80 KB user-data RAM, 32 KB instruction cache | 520 KB |
| RTC memory | 512 B | 16 KB |
Both chips support 802.11 b/g/n WiFi on the 2.4 GHz band. The ESP32 additionally supports HT40 (40 MHz channel width), which can roughly double WiFi throughput if wider channels are available. For most home automation projects the difference in WiFi performance is not noticeable, but it matters for applications that transfer large amounts of data.
The bigger connectivity gap is Bluetooth. The ESP8266 has no Bluetooth. The ESP32 supports both Bluetooth Classic (4.2) and Bluetooth Low Energy (BLE). This makes the ESP32 the only option for projects that communicate with smartphones, fitness sensors, BLE beacons, or any device that uses Bluetooth rather than WiFi.
Beyond wireless, the ESP32 adds two wired interfaces the ESP8266 lacks entirely: a CAN bus controller and a 10/100 Mbps Ethernet MAC interface (an external PHY chip is still required for Ethernet, but the MAC is integrated). These are relevant for industrial and automotive projects where CAN is the standard communication bus, or for applications that need a wired network connection.
Note that for serious CAN bus projects, a dedicated microcontroller such as an STM32 with a proper CAN abstraction layer is usually the better choice. See the Type-Safe CAN Layer in C++ article for a practical implementation.
The ESP8266 has 17 pins in total, of which only 11 are freely usable as GPIO. The remaining pins are reserved for boot mode selection, the serial flash interface, or have other constraints that make them unreliable for general use. Several pins must be in a specific state at boot, which means they cannot always be freely driven by external hardware. This is a constraint that requires some planning in circuit design. A detailed breakdown of which pins are usable and which are constrained is covered in the ESP8266 GPIO reference article.
The ESP32 has 34 GPIO pins with far fewer constraints. It also supports pin multiplexing, which allows most pins to be assigned to different peripherals in firmware. This means I2C, SPI, and UART are not fixed to specific pins but can be mapped as needed.
The table below shows the significant difference in peripherals between the two chips.
| Peripheral | ESP8266 | ESP32 |
|---|---|---|
| ADC | 1 channel, 10-bit, 0–1 V input range, up to 20% error | 18 channels, 12-bit |
| DAC | None | 2 channels, 8-bit |
| Touch sensors | None | 10 capacitive GPIO pins, no external components needed |
| PWM | 8 channels (software) | 16 channels (software) |
| SPI | 2 | 4 |
| I2C | 1 | 2 |
| I2S | 2 (limited by single-core CPU) | 2 (practical with dual-core CPU) |
| UART | 2 (one output-only) | 3 |
| IR remote | None | TX/RX, up to 8 channels |
| Pulse counter | None | Hardware, full quadrature decoding |
| CAN | None | 1 |
| Ethernet MAC | None | 10/100 Mbps (external PHY required) |
For projects that involve more than one or two sensors, or that require usable analog readings, the ESP8266's peripheral limitations become a hard constraint. The single ADC channel is a particular pain point. Many projects need to read multiple analog sensors simultaneously, which is simply not possible on the ESP8266 without external multiplexers or external ADCs. For everything else, connecting 5V devices to the ESP8266's 3.3V GPIO requires level shifting, which is covered in the ESP8266 5V devices article. The same applies to the ESP32.
The ESP8266 has no built-in sensors while the ESP32 includes three (two working):
| Sensor | ESP8266 | ESP32 |
|---|---|---|
| Hall effect sensor | None | This sensor is not working correctly and is considered unreliable. [3] |
| Capacitive touch | None | 10 GPIO pins, no external components needed, can wake from deep sleep |
| Internal temperature | None | Measures die temperature only, not ambient temperature |
None of these sensors are essential for most projects, but the touch sensor in particular are a nice to have that removes the need for dedicated touch controller ICs in projects that use touch input.
Power consumption is the one area where the comparison between the two chips is not straightforward. The common assumption that the ESP8266 is better for battery-powered projects is not universally true, and depends on how the project uses the chip.
Both chips support multiple power modes. The table below lists the current draw for each:
| Mode | ESP8266 | ESP32 |
|---|---|---|
| Active (WiFi on) | ~80 mA avg, up to 430 mA peak | ~160-240 mA avg |
| Modem sleep (CPU on, WiFi off) | ~15 mA | ~20 mA |
| Light sleep | ~0.9 mA | ~0.8 mA |
| Deep sleep | 20 µA | ~10 µA |
| Power-down (RTC off) | 5 µA | N/A |
| Hibernation | N/A | 5 µA |
| Power-off | N/A | 1 µA |
When the WiFi radio is on and transmitting, the ESP8266 draws significantly less current than the ESP32. Roughly half on average. For projects where the chip spends most of its time awake and connected, this translates directly into longer battery life. A simple sensor that wakes up every 10 seconds, connects to WiFi, sends a reading, and stays connected will run longer on an ESP8266 than on an ESP32 with an equivalent battery.
The interesting result is in deep sleep. The ESP32's deep sleep current (10 µA) is lower than the ESP8266's (20 µA). The ESP32 also adds hibernation mode at 5 µA and power-off mode at 1 µA. Both are unavailable for the ESP8266.
For a sensor node that wakes up briefly every few minutes to take a reading and transmit it, then returns to deep sleep, the time spent awake is short and the time spent sleeping dominates the battery budget. In this scenario, which is probably the most common for battery-powered IoT devices, the ESP32 can actually outlast the ESP8266 on the same battery, despite having higher active power draw.
The full breakdown of power modes, sleep current measurements, voltage regulator selection, and battery runtime formulas for the ESP8266 is covered in detail in the ESP8266 on battery article. The same principles apply to the ESP32.
One important difference is in how the two chips handle deep sleep wakeup: on the ESP8266, waking from deep sleep requires an external connection from GPIO16 to the RST pin, and the chip performs a full reset on wake where all data in RAM is lost (unless saved in RTC memory, manual work). The ESP32 has multiple wakeup sources including a timer, touch pins, and external GPIO, and retains data in its RTC memory (16 KB) across deep sleep cycles. This makes the ESP32 significantly easier to work with in battery-powered designs that need to preserve state between sleep cycles.
The ESP8266 is cheaper. This is its clearest and most consistent advantage. Bare ESP-12F modules typically cost around $1.50-3 each depending on where you buy them. ESP32-WROOM-32 modules typically cost $3-6. Development boards (NodeMCU-style) cost somewhat more in both cases due to the added USB interface and voltage regulator circuitry.
The price gap has narrowed over the years, and for one-off projects or small quantities the difference is rarely a big concern. Where it matters is in high-volume production: if you are building 500 units of a simple WiFi sensor and the ESP8266 does the job, choose the ESP8266. For prototyping or small runs, the ESP32's is just easier to work with and much less hassle for an additional $2-3.
The ESP32 was designed as a direct successor to the ESP8266, which means most of its improvements exist specifically to address problems that ESP8266 users ran into. Understanding these limitations explains why the ESP32 exists in the form it does, and helps set realistic expectations for anyone still using the older chip.
delay() or yield() calls, or the watchdog timer will reset the chip. Writing code that does anything time-consuming while maintaining a stable WiFi connection requires planning. The ESP32's dual-core architecture eliminates this problem.ESP.deepSleep() sometimes does not enter deep sleep correctly. Adding delay(100) immediately after the call is a well-known workaround, but it is the kind of chip-level quirk that you actively have to keep track of.None of these limitations are real dealbreakers you cannot work around. But they require workarounds and impose design constraints that simply do not exist on the ESP32.
Both chips are supported by the same set of development tools:
One important caveat: ESP8266 and ESP32 Arduino code is not drop-in compatible. Pin numbers, some API calls, and library implementations differ between the two cores. Code written for the ESP8266 will usually need adjustments to run on an ESP32, particularly anything that uses specific GPIO numbers, the ADC, deep sleep, or WiFi connection handling. The changes are typically small though.
In terms of community resources, the ESP8266 has a slight historical advantage. It has been around longer and has a larger base of existing tutorials and forum threads. In practice this difference is not that significant, as the ESP32 ecosystem has matured and most questions have well-documented answers.
The ESP32 is not a single chip but a growing family. The original ESP32 (dual-core LX6, WiFi + BT 4.2) remains widely used, but Espressif has released several variants that extend the family in different directions:
The ESP8266 is in maintenance mode. Espressif continues to provide security patches and basic support, but no new variants are planned and active development has effectively stopped. For any new design, the ESP32 family is the strategic choice — it has a longer support horizon, a broader feature set, and a growing ecosystem of variants that cover almost any IoT use case.
This article is part of a complete ESP8266 guide. The articles below cover the topics referenced throughout this comparison in full detail:
Build a multi-switch useless box with a single moving arm, custom PCB, and 3D-printed mounting — full Arduino code and STL files included.
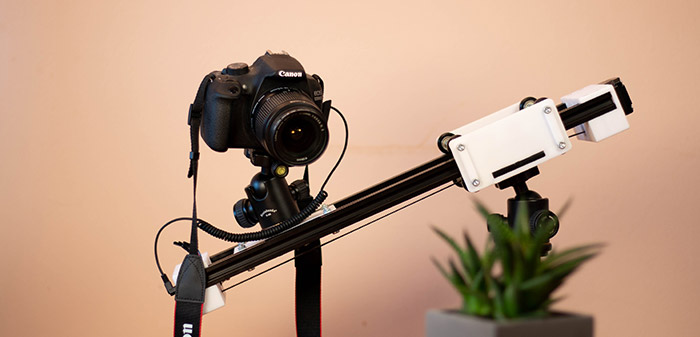
Build a WiFi-controlled DSLR camera slider for under $100 with 3D-printed parts — full BOM, wiring, and control code included.

This project (with exceptions) is published under the CC Attribution-ShareAlike 4.0 International License.
1: As an Amazon Associate I earn from qualifying purchases.